TABLES
watering made easy

Since around 2010, I’ve been collecting and growing carnivorous plants, primarily American pitcher plants (genus Sarracenia) and the world-renowned Venus flytrap (Dionaea muscipula). Unlike most garden plants, these swamp-dwelling carnivores thrive sitting in water nearly constantly, with the caveat that chronic stagnant water can lead to root rot. Thus, some variability of the water table is optimal. This is usually facilitated via small trays or saucers of water, which can be easily dumped out and replenished if the water ever becomes too stagnant. For larger collections, however, this method quickly becomes unwieldy and time-consuming, with daily watering a necessity during the heat of summer. Since my collection now numbers in the hundreds of plants, a more optimized system is essential.
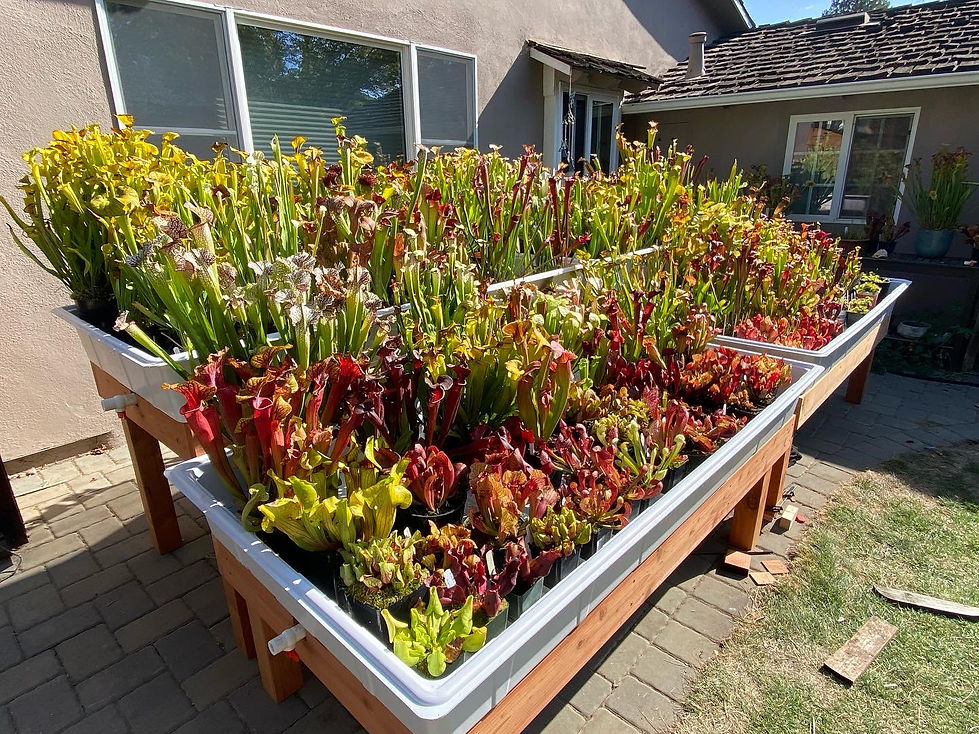
In the summer of 2022, I designed and built four water tables to house the majority of my collection. My core design needs were as follows, ranked roughly by order of importance:
-
Ease of use: It should be fast and simple to manipulate the water level in the tables via filling and draining. Plants should not have to be removed to drain the water.
-
Space optimization: Tables should be able to house as many plants as possible in the available patio area, optimized such that all plants receive adequate sunlight and do not shade one another excessively.
-
Longevity: Sturdy, long-lasting construction must withstand the elements and the weight of the plants/pots/water.
-
Aesthetics: Tables should be visually pleasing and aesthetically “cleaner” than the prior assortment of garden furniture and trays.
Since the scope of this project was so clear, the brainstorming and concept downselection was straightforward. I knew that I wanted to use commercial water trays (sometimes called flood tables) on redwood table bases (Longevity + Aesthetics), with custom plumbing to allow easy draining (Ease of use). I knew the space I had to work with, and I also decided early on that terracing the tables would minimize shading between plants (Space optimization). Given standard lumber and water tray sizes, four 3’ x 6’ tables made the most sense.

Due to the large size of this project, my garage woodshop was inadequate, and I did all the construction outside. This meant cutting down large redwood boards with a circular saw and a miter saw. To join the boards together, I opted for self-tapping deck screws that require no predrilling, allowing me to assemble the table frames in mere minutes without assistance. While this method of joinery is certainly not the strongest—woodworking purists would surely scoff at my lack of mortise and tenons—the loading condition for the tables is pure static weight, with no shear or racking forces to consider. With two screws per joint, eight joints per table frame, and an additional sixteen screws to lock in the legs, I’m not worried in the slightest about strength. It’s a similar design philosophy to framing a house or building a deck, in which sufficient redundancy of individually inadequate boards and fasteners produce a composite product that can easily resist the necessary loads.


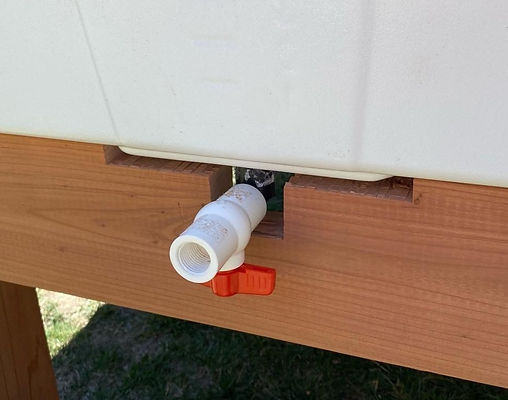
Once I had finished building the main structure of the tables, I notched out one runner on each table to provide clearance for a PVC ball valve assembly. This assembly consists of a bulkhead fitting, a 90-degree elbow, and a ball valve, and it facilitates easy drainage when necessary. Drilling a hole in the rather expensive water trays was certainly nerve-racking, but thankfully the bulkhead fitting slotted in perfectly, and a couple O-rings made for a watertight seal.
After that, all that was left was to fill the tables with plants and water! I did end up making some plywood shims to level the tables as much as possible, ensuring an even water table for all the plants. This was tricky to do given the weight of the tables, but I was able to jury-rig a jack with a clamp, a scrap block of wood, and a steel rod, allowing me to lift one corner at a time and slip in a few shims.


Old hodgepodge versus new tables!